Struggling to update your email in Contact Form 7? Here’s a simple, step-by-step guide on how to change email in Contact Form 7, troubleshoot issues, and avoid email delivery problems straight from real experience.
I remember missing a client message because my form was still sending to an old email. That small mistake could’ve cost me big. Whether you’ve updated your business email, switched team roles, or just want more control over where your contact form leads go, this guide is for you. I’ll walk you through how to change email in Contact Form 7, fix common problems, and make sure your messages never get lost again. Let’s dive in and get your inbox sorted fast.
Table of Contents
- Why You Might Need to Change Email in Contact Form 7
- Where Contact Form 7 Sends Emails by Default
- How to Change the Recipient Email in Contact Form 7 (Step-by-Step)
- Want to Send Emails to Multiple or Conditional Addresses?
- Still Not Receiving Emails After Changing? Try This
- How to Test Contact Form 7 Email Settings
- How to Edit Admin Email in WordPress
- All Questions About Contact Form 7 Email Settings—Solved
- Changing Your Email in Contact Form 7 is Easy
Why You Might Need to Change Email in Contact Form 7
Not getting messages from your contact form? You might need to change the email in Contact Form 7. This often happens if:
- Your form still sends to an old admin email.
- You’ve changed your business contact.
- Another person now handles submissions.
- Or nothing’s showing up in your inbox.
You should update the form’s email if messages are missing or being sent to the wrong person.
I once missed a project lead because my form was pointing to an unused inbox. That’s why updating your CF7 settings is more than just a small tweak it can save real opportunities.
Where Contact Form 7 Sends Emails by Default
By default, Contact Form 7 sends emails to your WordPress admin email address the one set under Settings > General. While that makes sense for new installs, it often causes confusion later.
Contact Form 7 sends messages to your WordPress admin email by default, which may not be the address you expect.
Many users assume the form will deliver to whatever email they type into the form or to their personal inbox. But unless you’ve changed the “To” field manually in the CF7 settings, it sticks to the admin email even if that’s outdated or unused.
To find your current admin email:
- Go to your WordPress dashboard
- Navigate to Settings > General
- Look for the “Administration Email Address” field
If you’ve handed the site off to someone else, it’s a good idea to double-check this address it might not be yours anymore.
How to Change the Recipient Email in Contact Form 7 (Step-by-Step)
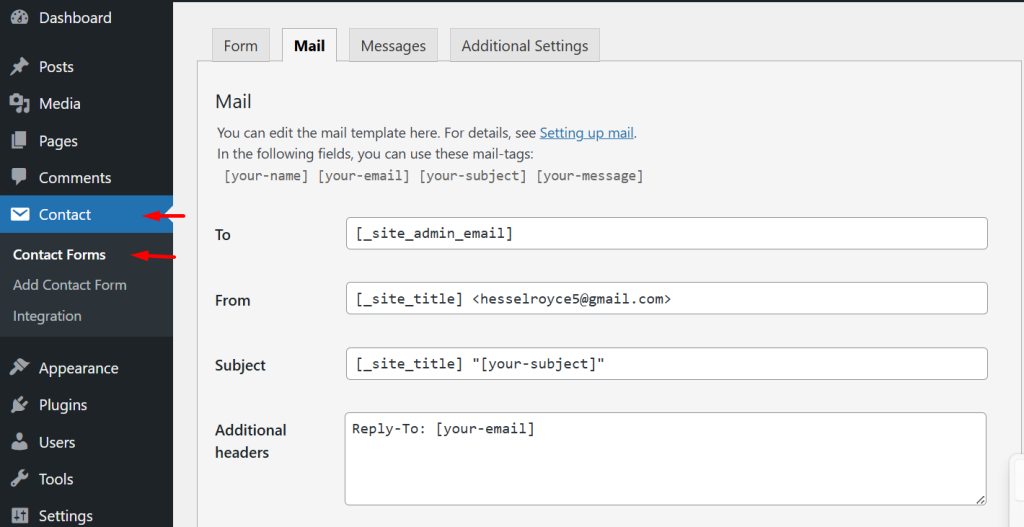
To change the recipient email in Contact Form 7, go to the form editor, open the “Mail” tab, and update the “To:” field with your desired email address.
Okay, let’s get hands-on.
- Head over to your WordPress dashboard.
- Click on Contact > Contact Forms.
- Find the form you want to edit and click Edit.
- Go to the “Mail” tab.
- In the “To:” field, replace the existing email with the one you want to use.
- Click Save.
That’s it you’ve now changed where your form messages get delivered!
Need the emails to go to multiple people? Just separate the email addresses with commas.
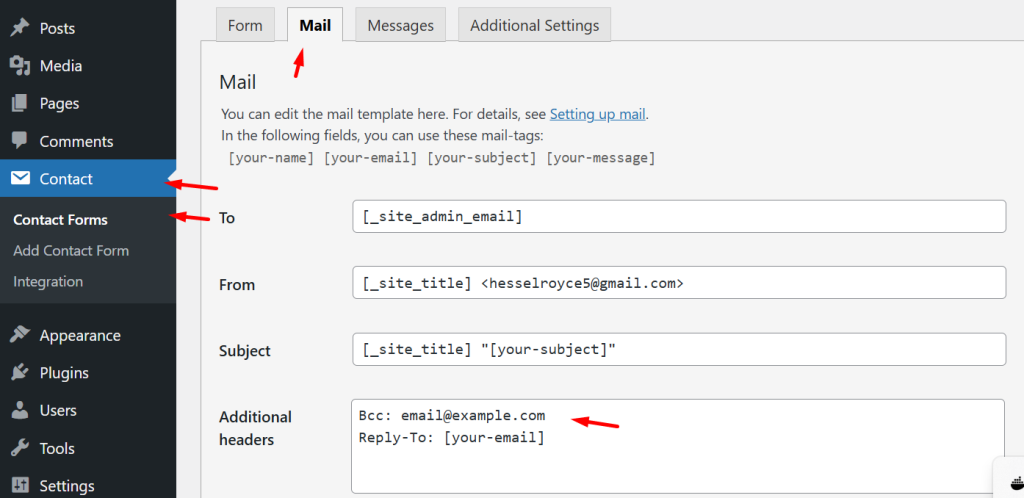
Want to send a hidden copy to someone (like a manager)? Use BCC (blind carbon copy) just add a Bcc: field below and pop their email there.
When I first tried this, I overthought it. I thought I needed a plugin or some tricky code. Nope! It’s just that one “To” field. But if you forget to hit “Save” after editing (yes, I’ve done that), your changes won’t stick so always double-check.
Want to Send Emails to Multiple or Conditional Addresses?
Sometimes one email address just isn’t enough. Maybe your support form should go to support@yourdomain.com, while sales inquiries land in sales@yourdomain.com. Or maybe you want the same form to send emails to different people based on what the user selects in a dropdown. Yes, Contact Form 7 can do that without complex code.
To send Contact Form 7 emails to different addresses, add multiple emails in the “To:” field or use conditional logic plugins to send based on user input.
How to Send Emails to Multiple Recipients
If you just want the form to email more than one person every time, here’s the simple trick: Separate email addresses with commas in the “To:” field.
Example: Graphql sales@yourdomain.com, manager@yourdomain.com
This works like a charm. I use it for client sites all the time especially when both the admin and a virtual assistant need to be in the loop.
You can also send a hidden copy by adding the BCC field (just like in email). This is great for forwarding inquiries to backup addresses without the sender knowing.
Conditional Logic: Make Emails Smarter with Plugins
Now let’s say you want more control like routing emails based on what users select in the form.
Here’s a real-world example: A user chooses “Support” from a dropdown, and the form sends the message to support@yourdomain.com. If they choose “Sales,” it goes to sales@yourdomain.com.
Contact Form 7 doesn’t support this out of the box, but you can easily do it with a free plugin like:
- CF7 Dynamic Text Extension
- Contact Form 7 Conditional Fields
These plugins let you insert hidden fields, dynamic email routing, and conditional visibility all without writing PHP.
Real-Life Example (With Plugin)
Here’s how I set it up for a client:
- Add a dropdown with options: Support, Sales, Billing.
- Use Conditional Fields for Contact Form 7 to show a hidden field with the matching email.
- In the “To:” field of the Mail tab, insert the dynamic tag (e.g., [your-department-email]).
From My Personal Experience
When I first needed conditional routing, I assumed I’d need a developer. Turns out, it was a 5-minute fix with the right plugin. It felt like unlocking a “pro” feature without writing a line of code.
And guess what? It made my client’s workflow 10x faster because now the right person got the right inquiry every time.
To send Contact Form 7 to different email addresses, use commas to separate multiple emails, or install a plugin like “Conditional Fields for Contact Form 7” to route based on form selections. No coding required.
Still Not Receiving Emails After Changing? Try This
So you’ve updated the “To” email in Contact Form 7… but messages still aren’t showing up?
You’re not alone. I’ve been there and yes, it’s frustrating. The form looks fine, no errors pop up, but your inbox stays suspiciously quiet. If that’s you right now, don’t worry. There are a few common culprits and easy fixes.
If your Contact Form 7 emails still aren’t landing in your inbox after updating the address, check spam, set up SMTP, and verify your domain’s email authentication records.
1. First, Check Your Spam Folder
It sounds basic, but it’s often overlooked. Emails from WordPress (like wordpress@yourdomain.com) are easy targets for spam filters—especially if your hosting server isn’t authenticated properly. Mark one of those emails as “Not Spam” to train your email provider.
2. Install an SMTP Plugin
WordPress’s native mail function (wp_mail()) isn’t reliable—especially with shared hosting. That’s where SMTP (Simple Mail Transfer Protocol) comes in. It routes your emails through a trusted mail server, boosting deliverability.
Popular SMTP Plugins:
- WP Mail SMTP – beginner-friendly and supports all major email services.
- FluentSMTP – lightweight, fast, and free.
- Post SMTP – has delivery logs and error tracking.
Setup Steps (Quick Overview):
- Install your preferred SMTP plugin.
- Choose your email provider (Gmail, Outlook, etc.).
- Enter your SMTP credentials.
- Send a test email to confirm it works
3. Check Your Domain’s DNS (SPF, DKIM, DMARC)
If you’re using a domain email like info@yourwebsite.com, your DNS needs authentication records. These verify your email is legit and not spammy.
Go to your domain registrar → DNS → Add SPF, DKIM, and DMARC records (your email provider will supply the correct values). Use tools like Mail-Tester.com or Google Admin Toolbox to check your email score.
How to Test Contact Form 7 Email Settings
To test your Contact Form 7 email settings, submit the form yourself, use an SMTP plugin’s test feature, or check delivery logs through tools like Post SMTP or Mailtrap.
You’ve updated the “To” email and saved your form. But how can you be sure it works? Always test your Contact Form 7 settings after making changes. That’s the best way to avoid missed leads or lost client messages.
1. Submit a Test Form
The simplest way to test is to go to your website and fill out the form like a visitor would.
Submit a test message directly on your site to confirm the form sends to your new email address.
Try sending something like: “This is a test submission please ignore.” Then check your inbox. If you receive it within a few seconds, you’re golden.
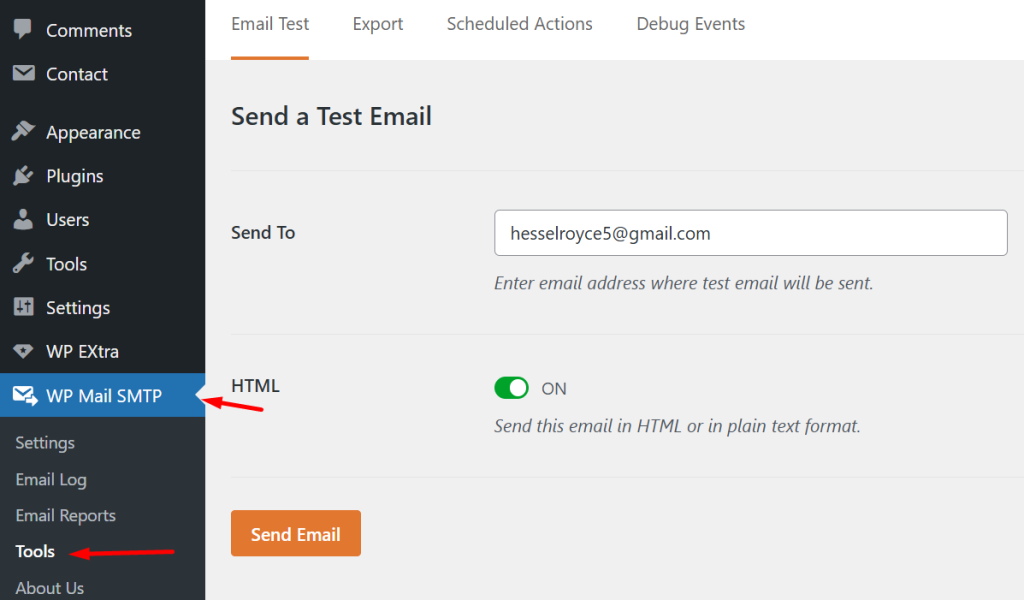
2. Use the SMTP Plugin’s Built-in Test Email Tool
Most SMTP plugins (like WP Mail SMTP or FluentSMTP) include a test email feature. It’s fast, reliable, and doesn’t depend on the form being filled out.
Use your SMTP plugin to send a test email and verify your site can send messages.
Go to: WP Mail SMTP → Tools → Email Test
Send a quick message to your updated address. If it fails, you’ll usually get an error explaining what went wrong (like DNS issues or wrong credentials).
3. View Email Logs with Post SMTP or Mailtrap
Want even more confidence? Use a logging tool like Post SMTP or a developer-friendly inbox like Mailtrap.
Enable email logging to track every message your form sends and catch delivery errors fast.
Post SMTP adds a log right inside your dashboard. You can see timestamps, recipients, and status (Sent, Failed, Queued).If something goes wrong, the logs usually tell you why.
Mailtrap is a bit more advanced but perfect for staging or testing without sending emails to real inboxes.
4. Test with Different Email Types
Sometimes, a test email lands fine in Gmail but gets blocked in your company inbox. Try sending to different email types like Gmail, Outlook, and your custom domain email to spot any filter problems.
Test your form with multiple email providers to catch deliverability issues early.
I once had a form that delivered flawlessly to Gmail but got silently dropped by a corporate inbox. A quick test saved me a week of head-scratching.
How to Edit Admin Email in WordPress
Changing the admin email in WordPress might seem unrelated to your contact form, but it actually helps keep everything in sync especially notifications.
To change it, just head to Settings > General from your WordPress dashboard. There, you’ll see the “Administration Email Address” field. Replace it with your new email, scroll down, and hit Save. WordPress will send a confirmation email—click the link inside to finalize the update.
This doesn’t just affect contact forms it also impacts site alerts like user registrations or plugin notifications. I always update it when handing off a site or switching business addresses. Keeps things clean and easy to manage.
To edit your WordPress admin email, go to Settings > General, enter your new address, save, and confirm it via the link sent to your inbox.
All Questions About Contact Form 7 Email Settings—Solved
1. How do I change the email address in Contact Form 7?
Open your form in the CF7 editor, go to the “Mail” tab, and update the “To:” field with your new email address. Hit Save and you’re done.
2. Why is Contact Form 7 not sending emails to my new address?
Your hosting server might block emails, or your DNS records (like SPF, DKIM) aren’t set up properly. Try using an SMTP plugin like WP Mail SMTP to fix the issue.
3. Can I use multiple recipient emails in Contact Form 7?
Yes! Just separate emails with commas in the “To:” field, or use BCC for hidden copies. For conditional routing, try a plugin like CF7 Smart Grid or Dynamic Text Extension.
4. How do I update the admin email in WordPress?
Go to Settings > General, change the admin email, and confirm it via the link sent to your inbox. This helps keep all notifications consistent across your site.
5. What’s the best way to test Contact Form 7 email settings?
Send a test message using the contact form, or use the test email feature in WP Mail SMTP or FluentSMTP. Tools like Mailtrap are great for staging sites.
Changing Your Email in Contact Form 7 is Easy
Let’s bring it all home. If your Contact Form 7 emails aren’t landing where they should, don’t stress it’s a quick fix.
- Edit the “Mail” tab – Open the form, go to the “Mail” tab, and update the “To” field.
- Add SMTP support – Install an SMTP plugin to make sure your messages actually get delivered.
- Always test – Send a form submission or use the plugin’s test email feature to confirm everything works.
It takes just a few clicks, but it can save you from missed leads and client silence. Small tweak, big impact!
Need help fixing CF7 email issues or setting up SMTP? Drop your question in the comments or check out our full WordPress troubleshooting guide.